



SHR3D IT SHREDDER
The SHR3D IT Shredder combines industrial-grade shredding and granulating in one high-performance system. Built for a wide range of applications, it delivers efficient material processing for demanding industrial workflows.
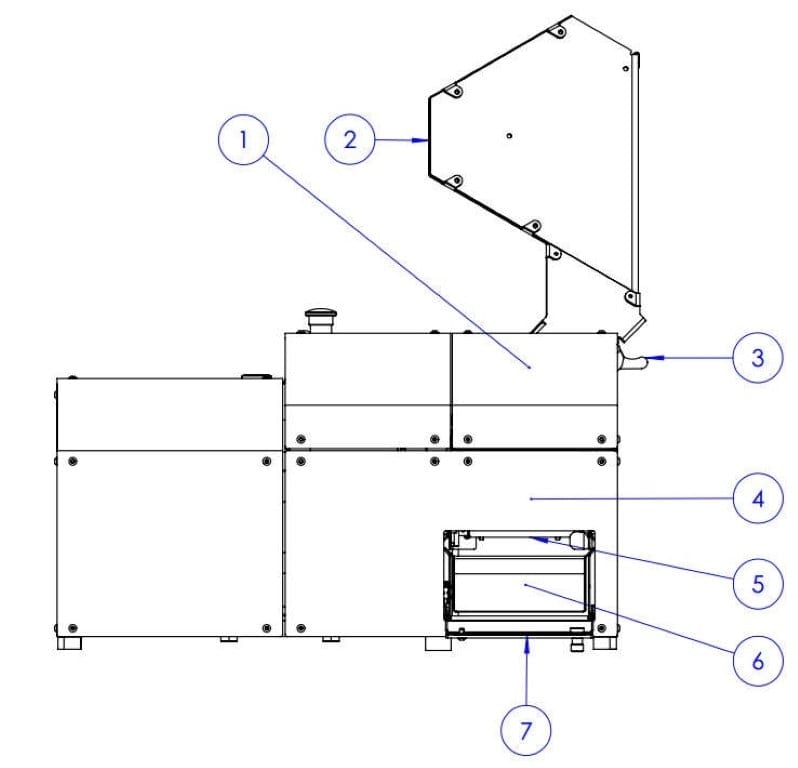
01. Shredder Compartment
As the first stage of plastic processing, the shredder compartment cuts, tears, and shreds plastic waste into smaller pieces, preparing it for efficient granulation.
02. Hopper
Designed for safe operation, the hopper prevents access to the shredder blades while keeping plastic waste enclosed inside the machine.
03. Hopper Locking Lever
The hopper locking lever securely holds the hopper in place while allowing safe, easy assembly and removal. It also serves as a safety mechanism, preventing operation unless the hopper is properly installed and helping protect users from accessing the shredder during use.
04. Granulator Compartment
The granulator compartment cuts plastic into smaller granules until they are fine enough to pass through the filter screen.
05. Shredder Compartment Latch
The latch unlocks the shredder compartment for easy access. Always ensure the filter screen is installed before operating the latch.
06. Granulate Collector
The granulate collector, located beneath the filter screen, collects processed granules for easy removal and storage through the interlock guard.
07. Interlock Guard
To remove the granulate collector, first open the interlock guard using the button in the top-right corner. The emergency stop circuit activates if the guard is opened while the machine is running, so always power off the machine beforehand.
01. Shredder Compartment
As the first stage of plastic processing, the shredder compartment cuts, tears, and shreds plastic waste into smaller pieces, preparing it for efficient granulation.
02. Hopper
Designed for safe operation, the hopper prevents access to the shredder blades while keeping plastic waste enclosed inside the machine.
03. Hopper Locking Lever
The hopper locking lever securely holds the hopper in place while allowing safe, easy assembly and removal. It also serves as a safety mechanism, preventing operation unless the hopper is properly installed and helping protect users from accessing the shredder during use.
04. Granulator Compartment
The granulator compartment cuts plastic into smaller granules until they are fine enough to pass through the filter screen.
05. Shredder Compartment Latch
The latch unlocks the shredder compartment for easy access. Always ensure the filter screen is installed before operating the latch.
06. Granulate Collector
The granulate collector, located beneath the filter screen, collects processed granules for easy removal and storage through the interlock guard.
07. Interlock Guard
To remove the granulate collector, first open the interlock guard using the button in the top-right corner. The emergency stop circuit activates if the guard is opened while the machine is running, so always power off the machine beforehand.
08. Start Button (Green)
Press and hold the Start button for one second to power up the machine. When both indicator lights are illuminated, the system is ready for operation and the shredder and granulator compartments will rotate forward. The machine will not start if:
- the hopper is not mounted correctly on the machine,
- the filter screen is not installed correctly
- the shredder compartment is not closed correctly
- the interlock guard is not closed,
- the motor temperature has been too high,
- the motor current has been too high,
- the switch on the power entry module is “O’’
- the power cable is not plugged in
It is advised to empty the granulator compartment before starting the machine.
09. Reverse Button (White)
Press and hold the Reverse button for 1 second to run the machine in reverse. If the machine is already operating, press Stop before switching directions. In reverse mode, the granulator shaft is disabled, as granulation is only effective in the forward direction. The button illuminates white to indicate reverse operation. Reverse mode is intended for the following purposes:
- To get a new grab on difficult shapes of materials
- To free the shredder blades from the material if it gets stuck.
- To roughly clean out the shredder compartment from big chunks around the shredder shaft.
- The same starting conditions as on the Start button apply to the Reverse button.
10. Stop Button (Red)
Press the Stop button to shut down the machine. The button remains illuminated red when the machine is powered off but still connected to the power supply.
11. High Temperature Indicator
If the high-temperature indicator lights up, the machine has automatically stopped because the motor exceeded 80°C. Allow the motor to cool before restarting, then press the Stop button to reset the indicator. Once both the current and high-temperature indicators are illuminated, the machine is ready to operate. If it shuts down again immediately after restarting, the motor requires additional cooling time.
12. Current Indicator
If the current indicator turns off, the machine has stopped due to excessive current caused by an overloaded or blocked shredder or granulator. Inspect and clear any blockages before pressing the Stop button to reset the indicator. Restarting without removing the blockage may cause the machine to shut down again.
13. Power Entry Module
Set the power switch to “I” to turn on the machine. The Stop button will illuminate red, indicating power is connected. Switch it to “O” to disconnect power completely, turning off the Stop button indicator.
14. Emergency Button
Press the emergency stop button to immediately cut power to the machine. To reset it, rotate the button counterclockwise until it releases.
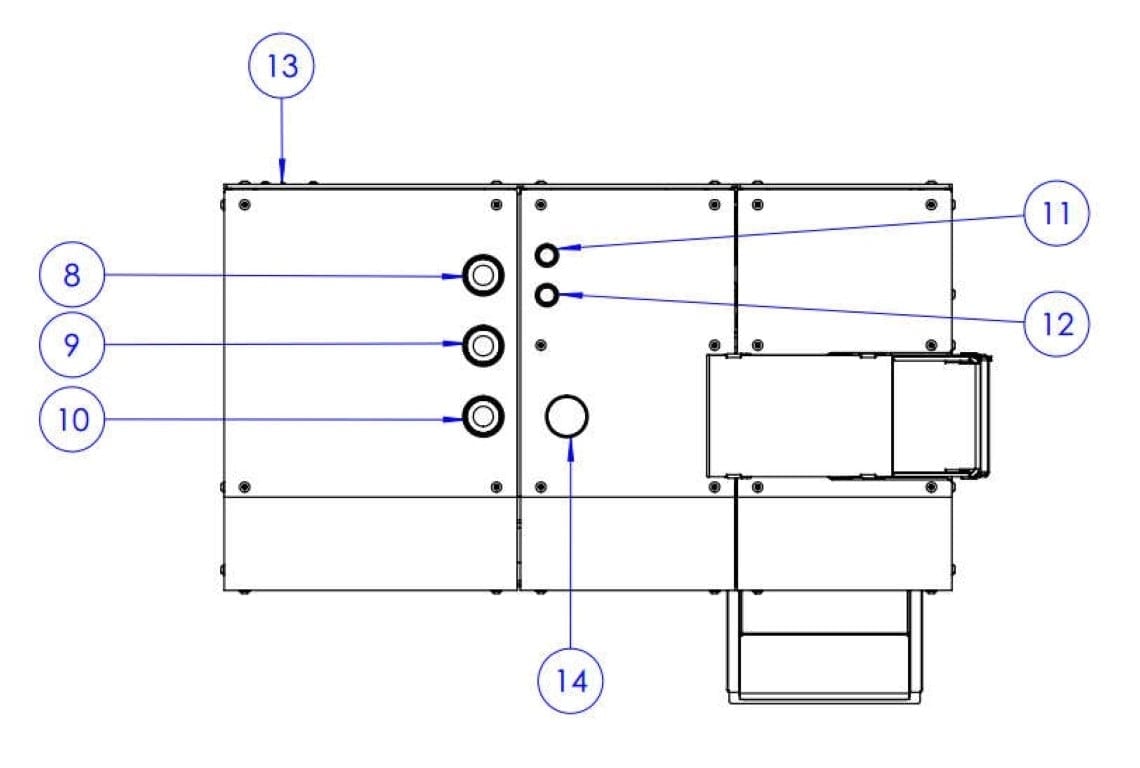
08. Start Button (Green)
Press and hold the Start button for one second to power up the machine. When both indicator lights are illuminated, the system is ready for operation and the shredder and granulator compartments will rotate forward. The machine will not start if:
- the hopper is not mounted correctly on the machine,
- the filter screen is not installed correctly
- the shredder compartment is not closed correctly
- the interlock guard is not closed,
- the motor temperature has been too high,
- the motor current has been too high,
- the switch on the power entry module is “O’’
- the power cable is not plugged in
It is advised to empty the granulator compartment before starting the machine.
09. Reverse Button (White)
Press and hold the Reverse button for 1 second to run the machine in reverse. If the machine is already operating, press Stop before switching directions. In reverse mode, the granulator shaft is disabled, as granulation is only effective in the forward direction. The button illuminates white to indicate reverse operation. Reverse mode is intended for the following purposes:
- To get a new grab on difficult shapes of materials
- To free the shredder blades from the material if it gets stuck.
- To roughly clean out the shredder compartment from big chunks around the shredder shaft.
- The same starting conditions as on the Start button apply to the Reverse button.
10. Stop Button (Red)
Press the Stop button to shut down the machine. The button remains illuminated red when the machine is powered off but still connected to the power supply.
11. High Temperature Indicator
If the high-temperature indicator lights up, the machine has automatically stopped because the motor exceeded 80°C. Allow the motor to cool before restarting, then press the Stop button to reset the indicator. Once both the current and high-temperature indicators are illuminated, the machine is ready to operate. If it shuts down again immediately after restarting, the motor requires additional cooling time.
12. Current Indicator
If the current indicator turns off, the machine has stopped due to excessive current caused by an overloaded or blocked shredder or granulator. Inspect and clear any blockages before pressing the Stop button to reset the indicator. Restarting without removing the blockage may cause the machine to shut down again.
13. Power Entry Module
Set the power switch to “I” to turn on the machine. The Stop button will illuminate red, indicating power is connected. Switch it to “O” to disconnect power completely, turning off the Stop button indicator.
14. Emergency Button
Press the emergency stop button to immediately cut power to the machine. To reset it, rotate the button counterclockwise until it releases.
| TECHNICAL SPECIFICATIONS | ||
|---|---|---|
| Hardware | Dimensions *excluding hopper | 550 x 310 x 310 mm 21.7 x 12.2x 12.2 inches |
| Blades - shredder | 9 RPM 6 premium shredder blades Reversible rotation | |
| Blades - Granulator | 900 RPM 3 superior granulator knives Replaceable | |
| Blades - Hardening treatment | High carbon and chromium air hardened steel | |
| Color | Industrial black exterior | |
| Energy | Consumption | 1100 W |
| Voltage | 220 – 230 V | |
| Frequency | 50 – 60 Hz | |
| Accessibility | Operation | 3 push buttons: On / Off / Emergency stop |
| Clean | Quick and easy access | |
| Adjust | Simple to change filter | |
| Repair | Replaceable knives | |
| Output | Speed | 5.1 kg 2.85 PLA filament / hour * 4.0 liter 2.85 PLA filament / hour * |
| Granulate diameter range | Filter screen hole size or smaller 2 – 4 mm (0.08 – 0.16 inches) | |
| Regrind filter | 4 mm (0.12 inches) included | |
Start printing your own metal parts today
Talk to our experts via Online consultation and request for a demo